
Caching Servers with Intune: Deploying Microsoft Connected Cache
If you're using Microsoft Intune to manage Windows updates and application deployments, implementing a caching server is worth considering — especially if your organization has multiple locations or limited WAN bandwidth.
A caching server can significantly reduce internet bandwidth consumption, improve download performance, and optimize the delivery of Windows updates and Intune-managed applications across your environment.
In this guide, I'll walk through deploying and configuring Microsoft Connected Cache (MCC) on a Linux server, and integrating it with Intune Delivery Optimization policies.
What Is a Caching Server?
A caching server is a dedicated on-premises server that stores content downloaded from Microsoft services, allowing devices within your network to retrieve that content locally rather than repeatedly downloading it from the internet.
In a typical Intune environment, Delivery Optimization is often configured to let devices download content directly from Microsoft while also leveraging peer-to-peer caching between endpoints. With Microsoft Connected Cache, updates and application packages are downloaded and stored on a local server first. Subsequent devices then retrieve that same content directly from the cache, reducing bandwidth usage and improving download performance.
Benefits include:
Reduced WAN bandwidth utilization
Faster application and update deployments
Improved download reliability at remote sites
Reduced dependency on peer-to-peer content sharing
Prerequisites
Before beginning the deployment process, make sure the following prerequisites are met.
Azure Subscription
Although hosting the cache server on-premises doesn't incur Azure compute costs, you'll still need an active Azure subscription to configure and manage Connected Caches for Enterprise & Education. You'll also need appropriate permissions within that subscription to create and manage Connected Cache resources.
For this guide, I'll assume your Azure environment is already configured. If it isn't, the resources below can help:
Server Operating System Requirements
Before deployment, determine which operating system will host your caching server. Both Windows and Linux are supported — I chose Linux for this implementation. Supported operating systems currently include:
Windows 11 (Build 22631.3296 or later)
Windows Server 2022 (Build 20348.2227 or later)
Ubuntu Server 24.04
Always check Microsoft's documentation for the latest platform requirements before deploying.
Creating the Connected Cache Resource
Navigate to the Azure portal.
Open Connected Caches for Enterprise & Education.
Click Create.
Select your Azure subscription.
Choose a resource group (or create a dedicated MCC resource group).
Select a host region.
Enter a resource name — for example:
IEEMicrosoftConnectedCacheImportant: Resource names cannot contain spaces or special characters.
Click Create.
Once deployment completes, open the newly created Connected Cache resource.
Creating Cache Nodes
Within your Connected Cache resource:
Navigate to Cache Node Management.
Select Cache Nodes.
Click Create Cache Node.
Each physical caching server requires its own cache node. Name each node something identifiable, for example:
DetroitUS1
ChicagoUS1
NewYorkUS1The cache node will now begin provisioning — give it some time to process.
Once complete, it will show a status of "registration in progress." Click the cache node to open it and continue configuration.
Configuring Storage
Configure the cache node's drive and storage requirements. Below is an example configuration, along with my recommended storage sizes based on endpoint count. Keep in mind these values can be adjusted later (up or down) — you'll just need to redeploy the cache server with a new deployment package.
Note: If your cache drive has a total of 500 GB, set your actual cache storage a bit lower — around 475 GB. I've personally never run into issues, but it's safer to leave some headroom.
Once configured, click Save and wait a few minutes for everything to process.
Downloading the Deployment Package
Return to the Cache Node page. Once processing finishes, the new cache node should show a status of Not Deployed.
Open the cache node again and select the Deployment tab at the top, then download the deployment package. From here, we'll move over to the Linux server.
Linux Cache Node Configuration
My server team installed and configured the Linux server for me, so this section assumes your server is already set up with the appropriate permissions. From here, we're focused solely on configuring the cache node.
Copy the deployment package to the server via SCP. Your command will look something like this (adjust paths as needed for your environment):
scp C:\Users\Ahoffman\Downloads\mccscripts.zip endpointguy@DetroitUS1:/home/endpointguyInstall an unzip utility on the Linux server:
apt install unzipUnzip the package to your cache drive. In this example, the cache drive is the destination:
unzip /home/endpointguy/mccscripts.zip -d /cachedriveMove the extracted contents to the root of the cache drive:
mv /cachedrive/MccScripts/* /cachedrive/Grant execute permissions to the deployment script provided by Microsoft:
chmod +x deploymcc.shNavigate to the script directory:
cd /cachedriveRun the deployment script using the exact command provided in the Azure portal's Deployment tab. (Seen in the screenshot above)
After deployment completes, wait 5–10 minutes, then check the status in the Azure portal. If all went well, you should see a status of Healthy.
Your caching server is now deployed. Repeat this process for any additional caching servers you plan to stand up.
Creating a Delivery Optimization Policy in Intune
With your caching server(s) up and running, the next step is creating a Delivery Optimization policy to direct your endpoints to use them.
Go to the Intune admin portal.
Navigate to Devices > Windows > Configuration and create a new policy.
Configure the following:
Platform: Windows 10 and later
Profile type: Templates
Template name: Delivery Optimization
Recommended Policy Settings
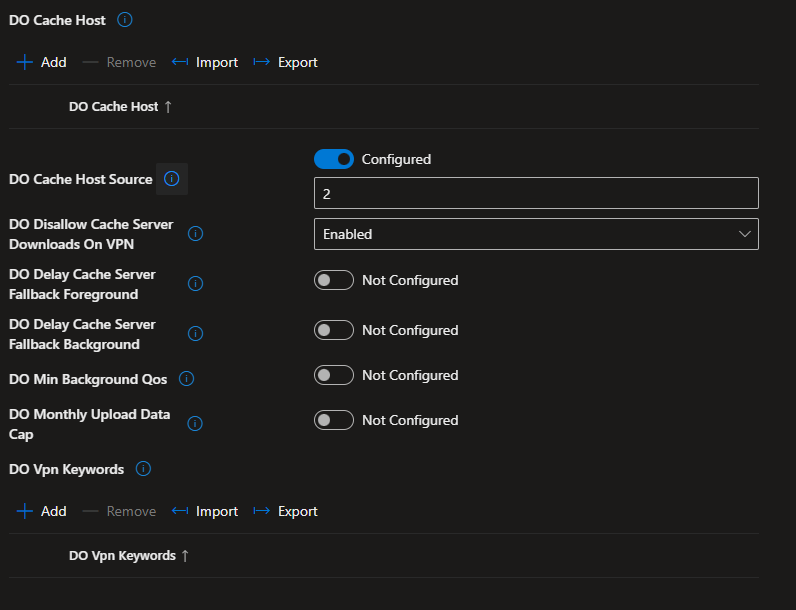
I recommend configuring the policy for HTTP only, no peering, no use of the DO cloud service. This forces endpoints to:
Download from Microsoft Connected Cache when available
Download directly from the Microsoft CDN when content isn't cached
Avoid LAN peer-to-peer sharing
Avoid internet peer-to-peer sharing
Avoid contacting the Delivery Optimization cloud service to discover peers
Everything else is set to Not Configured, which just means they’re using the Microsoft defaults. These worked fine for my environment, but feel free to review each individual setting for your environment.
You can manually configure each individual DO Cache Host by clicking Add. This works well if you only have one Delivery Optimization policy and one caching server.
However, if you have multiple caching servers, deploying multiple DO policies quickly becomes messy — you'd need to filter devices by location, which adds unnecessary complexity. In that case, it's best to auto-discover caching servers using DHCP Option 235, which we'll configure next.
Save your policy, but hold off on assigning it until DHCP Option 235 is configured in the steps below.
Configuring DHCP Option 235
For your caching server to be auto-discovered, you'll need to configure Option 235 on each DHCP server at every location. This may vary depending on your infrastructure, so if you don't have a DHCP server at each site (or your environment is structured differently), you may need an alternate approach.
My server team handled this configuration, but the general steps are outlined below.
Open DHCP management on your DHCP server: Server Manager > Tools > DHCP.
Expand IPv4 and select the appropriate scope.
Right-click and choose Set Predefined Options.
Click Add and enter the following:
Name: DOCacheHost
Data type: String
Code: 235
Description: Microsoft Connected Cache Host
Click OK.
Assigning the Option
Go to Scope Options > Configure Options.
Check the box for 235 DOCacheHost.
Enter your cache server name, for example:
mcc-detroit.corp.endpointguy.com
Assigning the Policy and Testing
Once Option 235 is configured, return to Intune and assign your Delivery Optimization policy — preferably to a group of test endpoints before rolling it out to production.
Allow time for affected devices to renew their IP address, or trigger it manually:
ipconfig /renewYou may also need to reboot the endpoint for the new option to take effect.
To generate real-time data, start pushing Windows updates or Company Portal application installs to your test devices. This may take a little time to populate. Once it does, you can review activity on a Windows 11 endpoint by going to:
Settings > Windows Update > Advanced Options > Delivery Optimization > Activity Monitor
On my own device, most content still shows as downloaded directly from Microsoft rather than the cache — largely because my PC is part of an early testing ring, so many of the applications it receives haven't yet been cached on the server.
Final Thoughts
Caching servers are a great way to reduce WAN usage in your environment while making applications and Windows updates available faster. That said, there are a few limitations worth keeping in mind.
Cached data is automatically removed from the server if it hasn't been accessed in 30 days, and there doesn't appear to be a way around this (at least none that I've found). If you deploy a large application via Intune that isn't installed very often, the caching server likely won't provide much benefit for it.
On the other hand, when an application update rolls out to a large number of endpoints, the first download caches it on the server, and every subsequent endpoint pulls it from the cache instead of the internet. That's really where the value shows up — optimizing bandwidth usage for high-frequency, high-volume deployments.